Ever found yourself fumbling with a stubborn handbag clasp? You know, the kind that just won’t click into place, no matter how hard you try. It’s frustrating, especially when you’re on the go and need your essentials secure and at hand.

But don’t worry, you’re not destined to a life of open totes and spilled contents. Fixing a handbag clasp might seem daunting, but it’s actually a quick fix you can master in no time. With a few simple tips and tricks, you’ll have that clasp snapping shut as if it were brand new.
So grab your troublesome bag and get ready to give it a new lease on life. You’ll be surprised at how easy it is to turn your handbag woes into a win.
Assess the problem
When your handbag clasp won’t cooperate, the first step is pinpointing the issue. Begin by examining both parts of the clasp closely. Check for obvious damage or misalignment that could be the culprit.
Ask yourself:
- Is the clasp stuck or loose?
- Are there visible obstructions like fabric or debris?
- Does the locking mechanism appear bent or out of shape?
Occasionally, the problem might be with the spring inside the clasp. Springs can wear out or break, which will affect the clasp’s ability to snap shut securely. This is a bit trickier to identify, but if your clasp has lost its usual resistance, a spring issue is likely.
If the clasp is stuck, a quick remedy involves using a pencil or similar tool to gently pry it open. But be gentle—forcing it can cause more damage. Rather than yanking or pulling, apply steady pressure and ease it open.
For loose clasps, the approach differs. Grab a pair of needle-nose pliers and carefully tighten the connections. These tools are perfect for getting into small spaces without causing additional stress to your bag.
When handling alignment problems, gently reposition the parts of the clasp until they click into place. Sometimes, it’s a simple matter of realigning the clasp with its counterpart. Remember, slight adjustments can make a big difference.
Tackling obstructed clasps typically requires a delicate hand. Remove any debris with a pair of tweezers. Avoid pulling hard on any loose threads—snip them instead. Protecting the handbag’s material during these fixes is paramount to maintaining its integrity and appearance.
If after all these checks and tweaks the clasp still isn’t operational, it might be time for a replacement part or a visit to a professional who specializes in handbag repair. Remember, it’s not just about function—preserving the bag’s aesthetic is crucial too.
Clean the clasp
Maintaining a clean clasp is key to its function and longevity. Dirt, grime, and residue can build up over time, causing the mechanism to become sticky. Start by wiping down both parts of the clasp with a soft, dry cloth to remove surface dust.
If the clasp still isn’t snapping open and shut as it should, you’ll need to do a deeper clean. For this, use a cotton swab dampened with rubbing alcohol. The swab should fit into the nooks and crannies, breaking down the gunk that’s hard to reach. Take care not to soak the material, as excess moisture can damage the clasp.
For persistent dirt in the crevices, gently use a toothpick to dislodge the debris. Be careful; you don’t want to scratch the metal or damage the mechanism.
After you’ve cleared away the debris, open and close the clasp several times to work out any remaining residue, ensuring it’s moving smoothly. If it’s still not functioning properly, a lubricant can be applied sparingly. Preferably, use a silicone-based lubricant which won’t degrade the metal or surrounding fabric. A tiny drop on the hinge can make a big difference.
Remember, over-lubricating can attract more dirt, so apply as little as necessary. Always wipe away excess lubricant with a clean, dry cloth. It’s important to keep chemicals away from the surface of your handbag to avoid potential damage to its material.
With your clasp clean and free of obstruction, it should clasp and unclasp effortlessly, ensuring your handbag functions as beautifully as it looks. Should you need to clean the clasp frequently, it may be worth considering the condition of where you store your handbag—keeping it in a protective dust bag can prevent a lot of the accumulation you’re fighting against.
Lubricate the clasp
Sometimes, a stiff clasp just needs a bit of TLC to glide back into action. When your handbag’s clasp isn’t snapping open and shut as it should, it’s often because it needs lubrication. But be careful—you want just enough to ease the movement, not so much that it oozes out and stains your bag.
Start by selecting the right lubricant. A silicone-based option is ideal; it’s clear, doesn’t attract dirt, and won’t degrade most materials your handbag is likely made of. Avoid oil-based products as they can leave a residue that attracts more grime over time.
« Protect Handbags: Proven Tips to Preserve Your Purses’ Elegance
Polish Fashion Handbag: Discover Affordable Luxury & Craftsmanship »
To apply, just use a cotton swab. Dip the tip in the lubricant and then apply it to the moving parts of the clasp mechanism. Focus on any pivot points and the areas where metal rubs against metal. Work the clasp open and shut a few times to help the lubricant distribute evenly. You’ll notice an immediate difference in how smoothly the mechanism operates.
If you’re on the go and don’t have access to silicone lubricant, a graphite pencil might do the trick. Simply rub the pencil tip on the areas where the clasp pivots. The graphite acts as a dry lubricant and can provide a temporary fix.
Remember, maintenance is key. Lubricating your handbag clasp isn’t a one-time fix—it’s part of regular upkeep. Keep an eye on the clasp’s performance and lubricate it whenever you notice it beginning to stick again.
By maintaining the clasp properly, you ensure both functionality and aesthetic appeal of your handbag remain intact for the long haul. Your handbag’s clasp may seem like a small detail, but it’s integral to the bag’s overall performance and style. Keep it working smoothly, and your handbag will look and function at its best.
Adjust the clasp mechanism
Occasionally, a handbag clasp may seem fine visually, yet it still malfunctions. A slight adjustment to the clasp mechanism might be all you need. Begin with a close inspection—look for tiny springs and levers within the clasp. They should move freely without obstruction.
If you find a spring that’s lost tension, carefully stretch it to enhance its elasticity. Do this with precision, as springs are delicate and can break easily. For levers that seem stuck, a drop of lubricant may release them. Never douse; a little goes a long way.
Perhaps the connection points are misaligned. When this happens, clasps won’t lock properly. Here’s what you can do:
- Use a flat-head screwdriver to realign the metal tongue within the clasp.
- Gently nudge the parts until they snap together snugly.
- Test the clasp several times to ensure it’s now secure.
Are there screws involved in the assembly? If yes, check if they’re loose. Tighten them with the appropriate screwdriver. But, be cautious not to over-tighten as this could strip the threads or damage the clasp.
For handbags with magnetic clasps, ensure the magnets are situated correctly. Magnets that have shifted out of place will weaken the clasp’s hold. Realign them, so they sit directly across from each other when the bag is closed.
In the case of a twist lock, ensure that the moving parts don’t grind against each other. Apply a tiny amount of lubricant to the base of the twisting mechanism. Rotate it several times to distribute the lubricant evenly.
Through these steps, you should see improved functionality. Keep the clasp’s mechanics in check to preserve the longevity and appearance of your prized handbag.
Replace the clasp
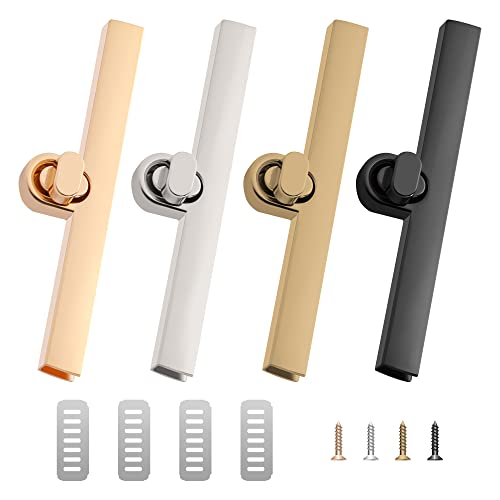
When quick fixes won’t cut it, it’s time to consider replacing the clasp on your handbag. Your first step: source a replacement. Look for clasps that match the size, style, and color of the original to maintain your bag’s aesthetic integrity. Sometimes, you may find an exact match from the handbag manufacturer, or you can opt for a universal clasp available at craft stores and online.
You’ll need a few basic tools: small screwdrivers, pliers, and perhaps a seam ripper if the clasp is sewn into the fabric. Lay out your tools and the new clasp on a clean workspace.
Removing the old clasp is your next challenge. If it’s screwed in, unscrew it carefully. For sewn clasps, gently use the seam ripper to detach it without damaging the fabric. With a metal clasp that’s riveted in place, you’ll need to drill out the rivets or seek a professional’s help.
Installation of the new clasp should mirror the removal process. If it’s a screw-in type, secure it tightly to prevent future wobbles or detachment. For sewn-in clasps, stitch it firmly ensuring the thread is strong enough to handle the weight and frequent manipulation.
Be precise with alignment when installing the new clasp. A misaligned clasp can cause frustration during use and may lead to another replacement sooner than you’d like. Double-check the clasp’s action before considering the job done—if it doesn’t snap or lock properly, adjust as needed.
Regular testing of the clasp’s functionality after replacement is essential. It ensures it’s holding up to everyday stresses and usage. If you’ve opted for a clasp with a different mechanism, such as a magnetic closure or a twist lock, familiarize yourself with its operation to avoid mishandling.
By choosing the right replacement and installing it correctly, you’re investing in the longevity and functionality of your beloved handbag.
Conclusion
You’ve got the know-how to tackle that pesky handbag clasp now. Whether it’s a quick fix or a full replacement, you’re equipped with the steps to ensure your favorite accessory is functional again. Remember, patience and precision are your best tools here. Don’t rush the process—take your time to get it right. And once you’re done, you’ll feel the satisfaction of a job well done every time you hear that satisfying click of a perfectly working clasp. Happy fixing!
Frequently Asked Questions
How can I identify the problem with my handbag clasp?
To identify the problem with your handbag clasp, carefully examine it for visible damage, misalignment, or debris that may be causing the issue. Assess the movement and whether the clasp opens, closes, or locks properly.
What tools might I need to fix a handbag clasp?
To fix a handbag clasp, you may need tools such as needle-nose pliers for prying or tightening, a small screwdriver for adjusting parts, and tweezers for removing debris.
Is it possible to clean and lubricate the clasp myself?
Yes, you can clean and lubricate a handbag clasp yourself by using a gentle cleanser to remove dirt and grime and applying a small amount of lubricant to the moving parts to ensure smooth operation.
How should I store my handbag to prevent future clasp issues?
Store your handbag in a cool, dry place, and ensure the clasp isn’t under unnecessary strain. Keeping it hung up or laid flat without pressure on the clasp can help prevent issues.
Can I replace a handbag clasp on my own?
Yes, you can replace a handbag clasp on your own by sourcing the correct replacement, carefully removing the old clasp, and securely installing the new one, making sure it’s properly aligned and functioning.
Where can I find a replacement clasp for my handbag?
You can find a replacement clasp at craft stores, online retailers specializing in handbag parts, or by contacting the manufacturer of your handbag if it’s a specific design.
What is important to remember when installing a new clasp?
It’s important to ensure that the new clasp is correctly aligned, securely attached with no loose parts, and that it opens and closes with ease. Regular testing of the clasp’s functionality after installation is crucial.


