Ever found yourself heartbroken over a damaged handle on your favorite handbag? You’re not alone. It’s frustrating when the perfect accessory starts to show signs of wear and tear, especially when it’s the handles that take a hit.

Understanding the different types of handbag handles
Handbag handles are more than just a functional part of your accessory; they’re also an essential style element. They come in various shapes, sizes, and materials, each adding a distinct personality to your handbag. Leather handles are classic and durable, often found on high-end designer bags. They age beautifully but are prone to wear over time.
For a more casual look, canvas handles are your go-to. They’re lightweight and flexible, making them perfect for everyday use. However, canvas can fray or stain, impacting your bag’s longevity and appearance. If it’s versatility you’re after, chain handles offer a blend of edginess and elegance. They can transform a simple bag into a statement piece, though they might dig into your shoulder or tarnish with use.
Let’s not forget about bamboo handles, which bring a touch of the exotic to your wardrobe. They’re sturdy and have a unique aesthetic but beware of splinters with prolonged use. On the opposite end of the spectrum are plastic handles, known for their wide range of colors and shapes. While they are affordable and playful, they can crack or break under too much weight.
Braided or rolled handles exude craftsmanship and comfort, often soft to the touch. They can show artisanal skill or provide a homemade feel, depending on the material used. Yet, they may unravel if not well-maintained or properly constructed.
When choosing a replacement for your bag’s damaged handle, consider both form and function. Match the handle type to your handbag’s style and think about the handle’s practicality for your daily activities. Remember that the right handle can elevate your handbag’s overall look while the wrong one can detract from its appeal.
Assessing the damage to your handbag handle
First up, you need to thoroughly inspect the handle. Look for obvious signs like tears, frays, or discoloration. Sometimes issues might be subtle, such as loose threads or slight warping. If your handle’s leather, cracking might indicate dryness, a common leather issue.
Next, evaluate the hardware. Buckles, clasps, and attachments could be the culprits. Are they securely attached? Is the metal tarnished or rusted? Failing hardware can compromise the entire handle’s integrity.
Don’t forget to test the handle’s strength. Gently tug on it to simulate the weight of the handbag’s contents. Any sign of give or unusual movement means there’s an issue that needs addressing. You’re not looking to break it, just assess its fortitude.


Check for internal damage. Feel along the handle, squeezing gently. If there’s a breakdown in the internal structure, you could sense irregularities such as bumps or emptiness.
If you’re dealing with a chain or metal handle, listen for any unusual sounds. Creaks or jingles could suggest loose links or broken welds that compromise the handle’s function.
For woven or braided handles, you’re checking for consistency in the weave. Look out for any signs where the pattern breaks or misaligns, indicating wear or potential failure points.
Remember, every detail counts. The tiniest flaw might grow over time, rendering the handle beyond repair. Spot these early, and you’ll save your favorite handbag from future heartbreak.
Tools and materials you’ll need
Before you dive into repairing your handbag handle, make sure you’ve got the right tools and materials on deck. It’s essential to be prepared, as using the wrong items could lead to more damage or an unsatisfactory repair job.
Gather Your Tools:
- Needle-nose pliers for manipulating small hardware
- A set of screwdrivers to suit various handle attachments
- An awl or hole punch to create or enlarge holes in leather or fabric
- Scissors for trimming loose threads or fraying material
- A leather punch, if dealing with leather handles, for precise hole creation
Select Your Materials:
- Matching thread for stitching repairs; opt for heavy-duty varieties if available
- Spare fabric or leather patches for significant tears or weak spots
- Quality glue suited for textiles or leather, depending on your handbag’s material
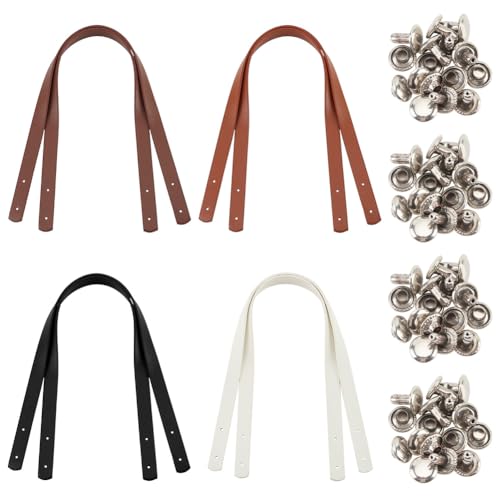
- Replacement hardware like rivets, clasps, or D-rings if the original is failing
- Leather conditioner or fabric protector to finish off the repair and protect the handle
Make sure the colors of your materials match your handbag’s aesthetic – it’s not just about function but maintaining style too. If you’re uncertain about the kind of thread or glue to use, check the manufacturer’s recommendations or consult with a professional at a craft or hardware store.
When you’ve assembled all the necessary tools and materials, you can proceed to repair your handbag handle with confidence, knowing you have everything needed to do a thorough job. Read on to understand the step-by-step process that’ll rejuvenate your favorite accessory. Keep in mind, repairing a handle often requires patience and a steady hand, but the end result is a more durable and good-as-new handbag ready for its next adventure.
Removing and replacing a broken handle
When you’ve gathered your tools and materials, you’re ready to tackle the handle. First, check how the handle is attached. Handbag handles can be sewn, glued, or riveted in place.


« How to Say Handbag in French: Chic Terms for Fashion Lovers
How to Keep Handbags in Wardrobe: Avoid These Storage Blunders »
For sewn handles, carefully cut the stitches with your scissors. Make sure not to damage the handbag’s fabric. Remove the broken handle and keep any salvageable parts like D-rings or tabs.
If the handle is glued, applying a small amount of acetone with a cotton swab can dissolve the glue. Only use as much as needed—acetone can damage some materials. Once the glue gives way, gently peel off the handle.
In the case of riveted handles, use your needle-nose pliers to remove the rivets. Support the fabric from behind to avoid tearing. Collect all the pieces; you’ll need them for reference when installing the new hardware.
Next, prepare the new handle. If you’re using a replacement, it might be ready to attach. If you’re creating one, measure and cut your spare fabric or leather to match the original. Punch holes for sewing or hardware with your leather punch or awl.
Attaching the new handle is a reverse process. If you’re sewing, use your matching thread to stitch it in place securely. For glued handles, apply quality glue sparingly and press firmly. Allow ample drying time before testing the handle.
With riveted handles, align the new handle and insert the new rivets. Use your hammer gently but firmly to set them in place.
Throughout the process, maintain the handbag’s integrity. Match colors and materials as closely as possible. The repair should look seamless, blending in with your handbag’s design.
After attaching the handle, condition the material. Leather conditioner or fabric protector can help prevent future wear and tear. Regular maintenance keeps your handbag looking its best.
Repairing a damaged handle
When you’re faced with a damaged handbag handle, assessing the extent of the damage is your first step. Check for tears, detachment, or material wear. If the damage is surface-level, such as peeling or minor tears, you can often fix it without a complete replacement. Start by cleaning the affected area with a suitable leather cleaner or a mild fabric solution for cloth handles. Apply a touch of leather glue or fabric adhesive beneath any flaps or torn pieces and press firmly to adhere.
If the damage is more significant, or if the handle has completely detached, you’ll need to follow the removal instructions for your specific handle type. Remember that sewn handles will require a needle and strong thread, potentially matching the original color and thickness. When reattaching, ensure your stitches are tight and evenly spaced to retain the handle’s strength.
For handles attached by rivets or glue, remove the old hardware with care, preserving any reusable components. After removal, clean the attachment points thoroughly to provide a smooth surface for the new handle.
When installing a new handle, use high-quality hardware for longevity. If the handle was sewn, stitch it back into place, double back over your stitching for additional reinforcement. Place new rivets or apply a fresh line of strong-hold glue if necessary. Always give the adhesive ample time to set before testing the handle’s security.
Through the repair process, it’s essential to regularly check the handle’s alignment. A twisted or uneven handle can cause discomfort when carrying and may stress the bag unevenly, leading to premature wear.
If during the assessment or repair you find internal structure damage like broken frames or support items, consider seeking professional help. A skilled craftsman can restore the bag’s structural integrity while ensuring the exterior appearance remains unscathed.
Remember to condition the handle post-repair. Whether it’s a new installation or a minor fix, treating the material will safeguard against future damage and maintain the handle’s appearance and flexibility.
Conclusion
You’ve got the know-how to tackle handbag handle repairs with confidence now. Remember, taking your time to assess the damage and choosing the right method for your bag’s unique needs will make all the difference. And don’t forget to treat your newly mended handle with a bit of TLC—conditioning it will help extend its life and keep your beloved accessory looking great. With these tips in your back pocket, you’re ready to bring your handbag back to its former glory. Happy fixing!
Frequently Asked Questions
What tools are required to repair a handbag handle?
To repair a handbag handle, you’ll need tools such as pliers, a screwdriver, scissors, a needle and thread, or adhesive, depending on whether your handle is sewn, glued, or riveted. You may also need replacement hardware that matches your bag’s style.
Can I repair a handle that’s been sewn onto the handbag?
Yes, you can repair a sewn handbag handle by carefully removing the stitching with scissors, then reattaching the handle using a needle and thread, ensuring it is secure and aligned with the original position.
What should I do if the handbag handle is glued?
For a glued handbag handle, gently remove the old adhesive with a suitable tool, clean the area, then apply a strong leather or fabric glue to fix the handle back into place.
How do I replace a riveted handbag handle?
To replace a riveted handle, you’ll need to remove the existing rivets with a screwdriver or pliers, then attach the new handle with replacement rivets, securing them in place with the relevant tools.
How can I match the new handle with my handbag?
Match your new handle by choosing the same color and material as your handbag. Collect any salvageable parts from the original handle as a reference for dimensions and style.
Should I use leather conditioner after repairing a handbag handle?
Yes, after repairing your handbag handle, it’s advisable to apply leather conditioner or fabric protector to the repaired area to maintain its appearance and increase its flexibility and durability.
What if the damage extends to the handbag’s internal structure?
If the damage extends to the internal structure, assess whether you can reinforce it with additional material or if it requires professional repair to ensure the integrity and functionality of the handbag.